

 HoneySuckle Rose Tag
This tag was created with the stunning kit by Sabre and is FREE! Grab it here:
http://sabresquillandparchment.blogspot.com/
My supplies can be found here: http://www.4shared.com/file/80311074/c97bf765/Honeysuckle_Rose_Tut_Supplies.html
Open up all my supplies and minimize them to make things easier.
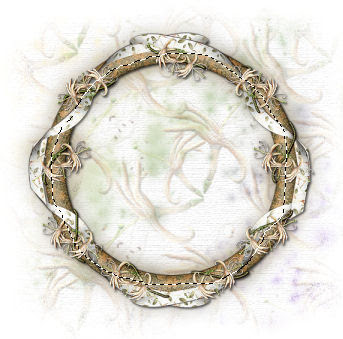
Open a new canvas 600 x 600 white background. Copy and Paste (c/p) onto your canvas and resize by 70%. Sharpen and duplicate. On your bottom frame layer: Adjust, blur, Gaussian Blur to 15%. Back on the top frame Drop Shadow (DS) 2/2/65/5.00
C/P your Honeysuckle paper 2. Layers, new mask layer, from image and apply Mask chj mask 5 provided. Merge Group. Duplicate and merge down 1. Pull these below your frame layer.
Select your top frame layer and with your freehand selection Lasso Tool, draw around the inside of the frame like so.....
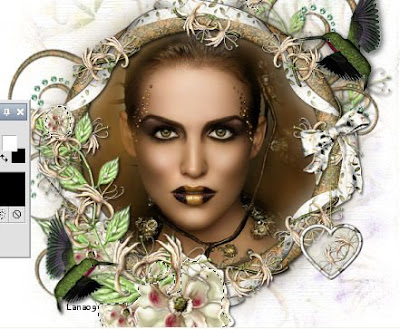
Copy your marbled brown background off of your tube image. Paste as a new layer onto your canvas. Resize by 125%. Invert and hit delete. DO NOT DESELECT!!!! C/P your face tube onto the canvas and position to your liking. Hit delete. Now you can deselect.
Open your Honeysuckle BLING from the kit and paste as a new layer. Resize by 75% and sharpen. Position it at the top right corner. Duplicate. Image, Free Rotate by 60% and move to the left of your frame. Merge Down 1 and pull these below your frame and frame background layer.
C/P your Honeysuckle Rose with bird 1. Resize by 50%. Sharpen and place on lower left side of your frame. DS 2/2/65/5.00
C/P Heart 3. Resize by 35%, sharpen. DS with same settings you just used. Place to right side of frame.
C/P Bow. Resize by 35% and sharpen. place above hanging heart 3. DS same settings. Merge down 1 to the heart. Now Resize the merged bow and heart 85% and sharpen. Reposition if needed.
C/P Rose Branch and resize bu 40%, sharpen. Image, Free Rotate Left 10%, sharpen again. Place over the top right bling. Drag it below your bling layer. DS same settings.
Click on your top layer in the pallets and merge visible. C/P the Hummer and resize by 30%, sharpen. Place over the top right corner and DS 2/2/75/10.00 Merge Down.
Resize all layers 75% and add your watermark and/or copywrite. You are done if you don't want to animate it.
.......Animating Your Tag......
Grab your freehand selection Lasso tool and make a circle on each flower or area you want to sparkle like this.....
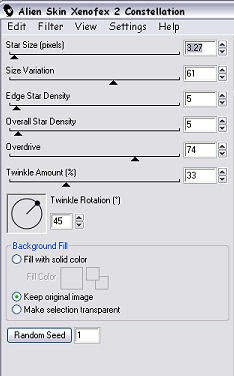
 Go to effects, Xenofex 2, Constellation. Apply these settings......
 Select none. Then Edit, Copy. Now open up animation shop and paste it as a new animation.
Back in PSP, hit ctrl and z on your keyboard at the same time two times. This should bring you back to the lasso but no sparkle. Now open Xenofex 2 again and hit the RANDOM SEED button once. ok. Select none and edit, copy again. Back to animation shop and paste AFTER selected layer.
Go back to PSP and hit ctrl Z two times again and repeat the Xenofex 2 but hit the RANDOM SEED once more. Deselect and edit, copy. Go back to animation shop one last time and paste after current frame.
You should now have 3 layers in animation shop.
On your keyboard, hit CTRL and A at the same time. This selects all your 3 frames at once. Go to Animation, Frame Properties and adgust the setting to 25 or whatever you prefer. click ok and save your image as a .gif.
Hope you enjoyed this tut.
Hugs, Lana
Select none. Then Edit, Copy. Now open up animation shop and paste it as a new animation.
Back in PSP, hit ctrl and z on your keyboard at the same time two times. This should bring you back to the lasso but no sparkle. Now open Xenofex 2 again and hit the RANDOM SEED button once. ok. Select none and edit, copy again. Back to animation shop and paste AFTER selected layer.
Go back to PSP and hit ctrl Z two times again and repeat the Xenofex 2 but hit the RANDOM SEED once more. Deselect and edit, copy. Go back to animation shop one last time and paste after current frame.
You should now have 3 layers in animation shop.
On your keyboard, hit CTRL and A at the same time. This selects all your 3 frames at once. Go to Animation, Frame Properties and adgust the setting to 25 or whatever you prefer. click ok and save your image as a .gif.
Hope you enjoyed this tut.
Hugs, Lana
No comments:
Post a Comment