This kit was created with the wonderful kit of Doris' at http://www.scrapsdimensions-dorisnilsa.blogspot.com/ called "Forgotten Days".
Friday, February 27, 2009
The View Tag Tut
Thursday, February 26, 2009
Another Fun Tut "Grunge Babe" FTU kit
This tut was created with the FTU kit by ScrapDimensions at: http://www.scrapsdimensions-dorisnilsa.blogspot.com/
The wonderful tube I used was by Andrew Sussmann and can be purchased here: http://mysteikllesinfulkreationz.ecrater.com/index.php You must have a license to use his tubes.
My additional supplies can be found here: http://www.4shared.com/file/89677414/f7568623/Grunge_Babe_Supplies_for_tut.html
Open a new canvas 600 x 600 white background. Unzip and open all supplies.
On your Frame template, Select all>float>Defloat. and C/P paper 3 from the kit. Select invert and hit delete. Select none. Now copy and paste this new frame onto your working canvas. You can close out the template now.
On your new frame layer, Effects>3D Effects>Inner Bevel with these settings: Bevel #2, Width 10, Smooth 10, Depth 15, Ambiance 0, Shininess 1, Angle 354, Intensity 45, Elevation 30, and Color White. Ok.
Magic Wand inside the 2 long boxes. Select>Modify>expand 4. Open paper #8 and c/p onto canvas. Select>invert>delete. select none. Move this below your frame. Magic wand the center of the heart. Expand by 4 and paste paper #2. Invert and delete. Select none.
C/P skull of choice from the kit. Resize by 40% and sharpen. Move to the center of the heart. D/S 2/2/45/5.00 Drop shadow the same to your frame layer.
Open the Grunge Babe Charm and c/p onto canvas. Resize 50% x 2 and sharpen. Place it over the heart part of the frame and erase part of the chain so it looks like it is coming through the heart. D/S 2/2/75/5.00
C/P a tube of your choice and resize to fit where you like. Remember to sharpen when you are done. D/S 2/2/75/10.00
Select your white background layer now. C/P a paper of your choice. I used #1. Layer>New Mask Layer from image and select the ESP_frayed squares mask. Merge group and resize 75%. Apply your paper again. Redo your mask again but select the BUTTERFLIES OVAL1222... mask. Merge Group and resize 75%. Center this onto your first mask layer and Merge this down to the first mask layer. Don't worry about your frame being off-center as we will fix that.
Select your top layer in palets. Open FLOWERS 6 and 7. Resize by 50% x 2 then 60% and sharpen. C/P onto your canvas. Position to your liking and D/S each 2/2/45/5.00. Merge your flowers together.
Open your Doodle #2 and resize by 50%. Sharpen. C/P onto canvas and move below your flowers. D/S same as flowers and merge together with flowers. Drag this layer below your charm layer but above your frame. Layers>Duplicate>Image>Mirror>Flip and position in the top left corner.
Make sure your tube layer is the top layer. If not, move it up. Hide your tube layer, Wht background, and mask layer. Merge Visible. Unhide all. Now you can center your frame onto the mask. D/S again if you like 2/2/45/5.00
Reposition your tube if needed and merge down to the frame layer. C/P Butterflies of choice and resize 40% x 2. Sharpen. Position to your liking and D/S same as before. Merge the butterflies down to your frame layer.
If you are not animating this tag, merge all layers together. Resize to your liking and sharpen. Add your name and copywrites, you are done! Yah!
ANIMATION:
Resize all layers to your liking. Sharpen and add your name and copywrites. Merge down to tag layer.
You should have 3 layers in your palets; Tag layer, mask layer and wht background layer. Select your mask layer. Effects>Alien Skin Xenofex>Constellation. These are the settings I used..... Star size 3.27 - Variation 0 - Edge Density 31 - Overall Density 6 - Overdrive 90 - Twinkle Amount 85 - Twinkle Rotation 45 - Keep Original Image Checked. Ok.
Edit>copy merged.
Open Animation Shop. Edit>Paste as a new animation.
Back to PSP. Ctrl Z to remove the constellation your put there previously. Reapply your constellation but hit the RANDOM SEED button once. Ok. Copy Merged. Go back to AS and paste after current frame.
Back to PSP and repeat the above one more time. Copy Merged. Go back to AS and paste again after currect frame.
Check your animation by clicking on the little movie icon in your task bar. Save as a gif and you are done! Yippie!
Hugs, Lana
Monday, February 23, 2009
My Love Tag Tutorial (PTU Kit By Justine Scraps)
The tube I used is also purchaseable at the same site above and created by the wonderful artist Andrew Sussmann @ http://www.imageartistry.com/ . Please do not use his work without a valid license.
Here is the mask I used. Thank you Becky for making it!! Just right click and save as.

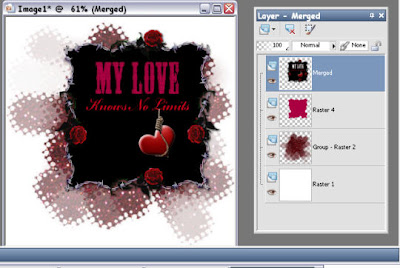
New Raster Layer. Flood fill this with black or any other color of choice. Select invert, delete and select none. Move this below your frame layer but do not merge it. If you are using the same frame, I brightened and cleaned it up a bit so if you so choose, here is what I did.... Select the frame layer. Go to ADJ>Brightness/Contrast and use these settings..... Bright 65 Contrast 45 and click ok. D/S your frame 2/2/45/5.00 twice.


DO THIS STEP ONLY IF YOU ARE NOT ANIMATING YOUR TAG! ANIMATION WILL BE BELOW.
Select your colored background and float, defloat it. Adj>Add noise>Uniform at 65% and Monochrome. Merge all layers, resize to your liking and sharpen.
Add your copywrites and name. You are done!
ANIMATION: This is a step by step on the animation for those new at it. If you are a pro, then you already know what to do so have fun with it!
Open Animation shop.
In PSP, Select your colored sheet layer. Ctrl A and Ctrl F> selections>defloat. Adj>Add noise>uniform 65% Monochrome ok. All of your layers should be open and visible! Select none. Go to Edit> Copy Merged.
Go to Animation shop and Paste as a new animation.
Go back to PSP and hit your Ctrl Z key twice. This makes the marching ants come back and removes the previous noise you did. Now, reapply the noise but DO NOT CHANGE THE SETTINGS! Select none. Edit>copy MERGED.
Back to animation shop and paste AFTER CURRENT FRAME.
Go back to PSP and remove and redo the noise one more time. Edit>copy Merged.
Back to animation shop and once again paste after current frame. You now have 3 frames of your tag. If you want to check your animation, just click on the little Movie Icon at the top right corner bar.
Save as a gif and you are done.
Hope you enjoyed this tut.
Hugs, LanaSunday, February 22, 2009
Tuesday, February 10, 2009
Oh Baby!!! Tut

I used the fantastic kit called "Sexy Dew" by Dee at: http://dees-deelights.com/store
The tube I used and mask can be downloaded here: http://www.4shared.com/file/87050252/1fa56939/Oh_Baby_Tut_Supplies.html
1. C/P Frame 4 and resize by 75%. Move over slightly to the left. Select inside the frame with your magic wand tool and selections>modify>expand byt 2.
2. C/P a paper of your choice from the kit and select>invert>delete. DO NOT DESELECT!!!! Invert again and C/P your tube of choice. Center into the frame, selections>invert and delete. Move the tube and the paper below the frame layer. On your frame layer, d/s 2/2/65/8.00 and then merge these three layers.
3. C/P your main tube onto the canvas. D/S 2/2/65/15.00 and position to your liking.
4. Open up the tags from the kit and lasso tool the one you want to use. Copy and paste it onto your working canvas. Resize 80%, sharpen and position to your liking.
5. C/P a Flower of choice onto your working canvas. Resize to your liking and sharpen. D/S 2/2/65/8.00
6. Hide your white background and merge visible.
7. C/P a paper of your choice from the kit onto your canvas. Open your mask I supplied. On your working canvas, Layers>New mask layer>BitchBkg with INVERT CHECKED. Ok. Merge Group. Duplicate this mask layer and merge visible.
8. Resize with all layers checked 400 x 400 pixels. Sharpen. Add your name and copywrites if any. Finis!!!!
Pretty simple one and hope you liked doing it.
Hugs, Lana
Let Me Call U Sweetheart Tut
Another Great PTU Kit by Dee (Love Berry) and you can find it here: http://dees-deelights.com/store/
The mask I used and the angel girl are in my zipfile here: http://www.4shared.com/file/87042771/253879d1/Let_Me_Call_U_SweetHeart_Tut_Supplies.html
Onward to the tut...lol.
1. Create a new pallet 600 x 600 white.
2. C\P Paper 5 from the kit. Layers>new mask layer from image>Ginasgem_Mask5>apply. Merge group.
3. C/P Frame 02 and resize by 50%. Sharpen
4. With your selection rectangle tool, draw just outside the center of the frame hole. C/P paper7. Select Invert and hit delete. Select none. Move your paper below the frame in the pallets layer and d/s the frame 2/2/65/8.00
5. C/P Heart Matt 6 (or your choice), resize by 35%. Move it into the center of your frame. sharpen and d/s the same as before.
6. C/P Ribbon 2 (or your choice), resize it by 75% and sharpen. Put it below the frame but above the background paper. Erase the ends that are sticking out. D/S the same.
7. Ok, minimize that pallet for now. Open a new pallet 600 x 600 transparent background. Pick 2 heart buttons and contrasting flower button from the kit. C/P both heart buttons onto this new canvas. Resize each by 60% and sharpen. Line up side by side but alittle overlapping. C/P your flower button of choice and resize 60%, sharpen. Put it onto the center of one heart button. Duplicate it and move it over to the second heart button. Merge all of those together. Resize by 45% and sharpen. Now duplicate the merged layer and move over so that it makes a line. Merge that down. Copy it from your drop down menu.
8. Open back up your working canvas and paste the heart/flower chain you just made. D/S 2/2/65/15.00
9. Copy the little angel I supplied or one of your own tubes. Position it so that it looks like it is sitting on your heart chain you just made. D/S you tube the same as the heart chain.
10. C/P Bow 2. Resize by 25% then by 75%. Sharpen. D/S 2/2/65/8.00 and move to the top corner of the frame. Image>Free Rotate>Right> 20%. Resharpen.
11. C/P Flowers of your choice onto the canvas. I resized each one 35% and sharpened. Move it to the right of your frame, below the heart chain. D/S 2/2/65/8.00
12. Hide your white background layer and your mask layer. Merge Visible. Resize by 90% and sharpen. Center on your mask layer and merge down.
13. With your rectangle selection tool, draw a box just around the outside of your mask. Image>Crop to selection. Resize by 85% all layers CHECKED. Merge Visible.
14. Still alittle blurry? Adjust>Sharpness>HIGH PASS SHARPEN> with radius 2.00, strength 20.00 and blend mode in soft light. Finis!!!!
Add your copywrite, name and save.
Hope you liked this tut.
Hugs, Lana
Monday, February 9, 2009
Heart 2 Heart PTU Tut
This tut was made with the fantastic kit "Berry Delight" made by Dee at:
http://dees-deelights.com/store
All other supplies are here: http://www.4shared.com/file/86050784/e3d47b1e/Heart_2_Heart_tut_Supplies.html
Including the awesome mask made by Sabre called "OtherWorldFae Mask 1".
On to the tut........
1. New pallet 600 x 600 white. Copy and Paste (C/P) Paper 1 from the kit. Layer>new mask layer>OtherworldFae mask1> apply. Merge Group.
2. C/P paper 1 again. Resize buy 65% and Drop Shadow (D/S) 2/2/65/8.00
3. C/P paper 5. Resize 65%. Image, free rotate LEFT 20%. D\S Same as above.
4. C/P paper 3. Do the same as you did on the last two only rotate RIGHT. Hige your white background layer and mask, merge visible. Unhide white background layer and mask.
5. C/P Ribbon 1. resize 55% and rotate LEFT 20%. Move it to the bottom right corner of your paper layer. Select your papers layer and CTRL A and CTRL F then selections>defloat. (Your papers should be outlined now). Selections>Invert and select the RIBBON layer and hit DELETE. Select none and d/s the ribbon same as above.
6. C/P the Wire heart 03. Resize by 75% and sharpen. With your magic wand tool, select inside the center of the wire heart (you may have to hide your papers and mask layer). Paste in my Cameo or another another tube of choice, center in the box and select>invert> Delete. Deselect. Move your tube or cameo below the heart. This step is optional but I then went to effects>Xero>Porcelain at 50/66/128/110/00 and moved the Blue lever to zero and the red to my liking. Merge the two. D/S same.
7. C/P Heart 5 and resize 50% and then 75%. Sharpen twice. Move below the wire heart in layers and position to your liking. D/S same.
8. C/P Bling. Resize by 40% then 75%. Sharpen. Move it to the top left corner. D/S 2/2/65/2.00
9. C/P flowers of choice. I resized mine all by 35%. Sharpen X 2. Position flowers to your liking and d/s the same as the bling you just did. Merge them together.
10. Make sure all layers are showing and merge visible. Resize all layers checked to 400 X 400 pixels. (or higher if you like). Sharpen.
11. Add your name and copywrites. Save as a jpg.
Hope you enjoyed this tut.
Hugs, Lana


