Saturday, January 24, 2009

Be Mine Tag Tut

Be Mine Tag Tut
This tag was made with the wonderful PTU kit of Doris' and can be purchased here at Scrap Dimensions: http://www.scrapsdimensions-dorisnilsa.blogspot.com/ My supplies here (cat and little girl): http://www.4shared.com/file/82317495/95020c54/Be_Mine_Tut_Supplies.html

1. Create a new canvas 600 x 600 white.

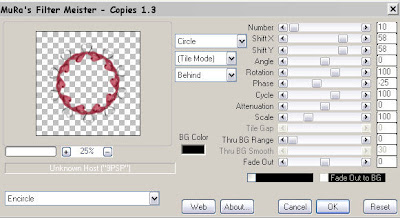
2. Open your FLOWER 3 and resize 20%. Adjust, sharpen, sharpen. Apply your Muria Meister Copies with Encircle and standard settings:

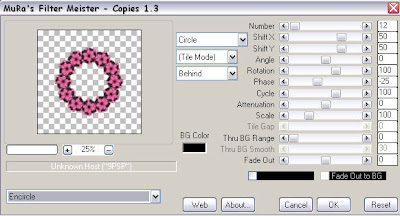
3. Open your RIBBON CURLED 2, resize 85% and c/p onto your canvas. Move to the bottom of your flower frame.

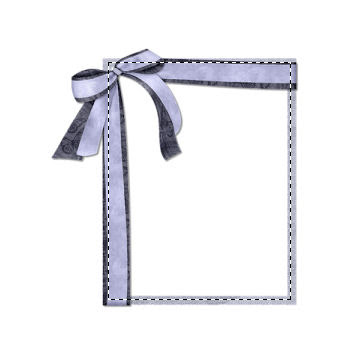
4. On your flower frame you made, Select all > float> Defloat. Position the ribbon if you need to so that most of the bow is in your dashed area.

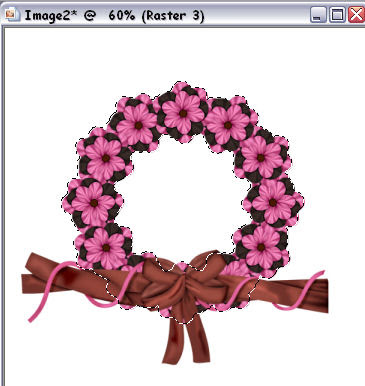
4. With your Lasso Selection tool, circle around the top of the bow and the hanging ribbon.

Selections> Invert> Delete. Now Deselect. The ends of your bow should now match the flower circle. Drop shadow (D/S) the bow to your liking. I used 2/2/45/5.00 and merge down to your flower ring.

5. Open your DOUBLE HANGER CHAIN and resize 25%. Adj, Sharpen, sharpen. C/P onto your canvas. Move it up onto the center of your top flower.

6. Open your HEART FRAME and resize 25%. C/P onto your canvas and move up to the hanger chain so it looks like it is hanging off of the chain. In the pallets layer, move this below the chain layer. Click on your chain layer and merge down to the heart frame. D/S same as before.

Hide your white background and merge visible.

7. Open your FENCE, resize by 75% Sharpen and move below your flower frame and position. Open Eyecandy 4000 Gradient glow and under the color tab, change the color square to #ef45dd. On the effects tab, change your slider settings to 3/25/100 and make sure the "draw only on outside" box is checked. Hit ok. D/S same as before.

8. C/P the girl tube or your tube of choice and postion. Resize and sharpen if needed. Place to your liking on the canvas. D/S the same but change your blur setting to double the amount (10). I did the same with the cat tube.

9. Open your BIRDHOUSE from the kit and resize 40%. C/P onto your canvas and sharpen. Open your BIRD, resize 20% then sharpen. C/P onto your birdhouse. Merge these 2 together. Apply D/S as you did with the original setting. Then do it again with your first two settings at -2. Gradient glow the bird and birdhouse with the same setting as before. Move the birdhouse to the side rung so that it looks like it is behind the fence.

10. Open BAG2 or one of your choice and resize 15%. Sharpen. D/S same as before and place to your liking. Hide your white background and merge visible. Unhide your background.

11. Open your DOODLE 1 and 2. C/P and place to your liking behind the flower wreath. Merge Visible.

12. Open your BE MINE text in my supplies and C/P onto the center of your hanging heart. Merge down.

Resize with all layers checked 75% then by 85%. Sharpen TWICE. Add your copywrites and watermark. Save as a jpeg.

Hope you liked this tut.

Hugs, Lana

Photobucket Photobucket Photobucket Photobucket Photobucket

Wednesday, January 21, 2009

Monday, January 12, 2009

Photobucket

HoneySuckle Rose Tag

This tag was created with the stunning kit by Sabre and is FREE! Grab it here:

http://sabresquillandparchment.blogspot.com/

My supplies can be found here: http://www.4shared.com/file/80311074/c97bf765/Honeysuckle_Rose_Tut_Supplies.html

Open up all my supplies and minimize them to make things easier.

Open a new canvas 600 x 600 white background. Copy and Paste (c/p) onto your canvas and resize by 70%. Sharpen and duplicate. On your bottom frame layer: Adjust, blur, Gaussian Blur to 15%. Back on the top frame Drop Shadow (DS) 2/2/65/5.00

C/P your Honeysuckle paper 2. Layers, new mask layer, from image and apply Mask chj mask 5 provided. Merge Group. Duplicate and merge down 1. Pull these below your frame layer.

Select your top frame layer and with your freehand selection Lasso Tool, draw around the inside of the frame like so.....

Copy your marbled brown background off of your tube image. Paste as a new layer onto your canvas. Resize by 125%. Invert and hit delete. DO NOT DESELECT!!!! C/P your face tube onto the canvas and position to your liking. Hit delete. Now you can deselect.

Open your Honeysuckle BLING from the kit and paste as a new layer. Resize by 75% and sharpen. Position it at the top right corner. Duplicate. Image, Free Rotate by 60% and move to the left of your frame. Merge Down 1 and pull these below your frame and frame background layer.

C/P your Honeysuckle Rose with bird 1. Resize by 50%. Sharpen and place on lower left side of your frame. DS 2/2/65/5.00

C/P Heart 3. Resize by 35%, sharpen. DS with same settings you just used. Place to right side of frame.

C/P Bow. Resize by 35% and sharpen. place above hanging heart 3. DS same settings. Merge down 1 to the heart. Now Resize the merged bow and heart 85% and sharpen. Reposition if needed.

C/P Rose Branch and resize bu 40%, sharpen. Image, Free Rotate Left 10%, sharpen again. Place over the top right bling. Drag it below your bling layer. DS same settings.

Click on your top layer in the pallets and merge visible. C/P the Hummer and resize by 30%, sharpen. Place over the top right corner and DS 2/2/75/10.00 Merge Down.

Resize all layers 75% and add your watermark and/or copywrite. You are done if you don't want to animate it.

.......Animating Your Tag......

Grab your freehand selection Lasso tool and make a circle on each flower or area you want to sparkle like this.....

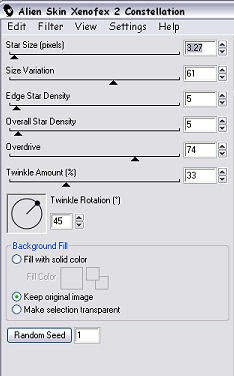
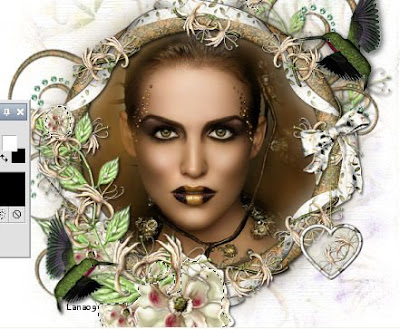
Go to effects, Xenofex 2, Constellation. Apply these settings...... Select none. Then Edit, Copy. Now open up animation shop and paste it as a new animation.

Back in PSP, hit ctrl and z on your keyboard at the same time two times. This should bring you back to the lasso but no sparkle. Now open Xenofex 2 again and hit the RANDOM SEED button once. ok. Select none and edit, copy again. Back to animation shop and paste AFTER selected layer.

Go back to PSP and hit ctrl Z two times again and repeat the Xenofex 2 but hit the RANDOM SEED once more. Deselect and edit, copy. Go back to animation shop one last time and paste after current frame.

You should now have 3 layers in animation shop.

On your keyboard, hit CTRL and A at the same time. This selects all your 3 frames at once. Go to Animation, Frame Properties and adgust the setting to 25 or whatever you prefer. click ok and save your image as a .gif.

Hope you enjoyed this tut. Hugs, Lana

Sunday, January 11, 2009

A Valentine 4 U ~~Tag Tutorial~~~

A Valentine 4 U

Thanks once again to Doris who created this beautiful PTU kit which can be found here:

Love Is In The Air Kit

http://www.scrapsdimensions-dorisnilsa.blogspot.com/

I used the wonderful work of Elias Chatzoudis and can be purchased here:

http://www.mypsptubes.com/

My additional supplies can be downloaded from here: http://www.4shared.com/file/80132834/86b93e5c/A_Valentine_4_u_Tut_Supplies.html

Plug ins needed: Mura meister Copies and EC4000 Gradient Glow

Create a new canvas 600 x 600 white.

Open your HEART RIBBON 1 and resize by 30%. Copy and paste as a new layer onto your canvas. Do Not Move It! Open Mura Meister Copies and apply these settings:

Click ok. Now with your Lasso Tool, draw a circle just inside the ribbon frame edge like this:

Open your paper #2 or of your choice. Resize it by 75%. Copy and paste as a new layer. Then Selections, Invert, Delete. Select None. Move this below your frame layer. Drop shadow frame 2/2/55/5.00

On your paperback layer you just made: select all, float, defloat and paste a close up of your tube onto the canvas. Select, invert, delete. Select none. Double click on your tube layer in the pallets and change the opacity to 25% or to your liking. Merge down 1. Highlight your frame layer and merge down 1.

Layers, new raster layer, select all. Copy paper 4 and back on your working canvas, paste INTO SELECTION. Select none. Apply your Gabby mask 13: Layers >New Mask Layer>Gabeemask13 with "Invert Mask Data" Checked. Merge group. Image, resize by 85% then by 95%. Sharpen.

Select your frame layer once again. Copy and paste the RED FLOWER from my supplies kit. Apply Mura Meister Copies again with the same settings but change the number amount to 16. Drop shadow 2/2/55/8.00 Move this flower circle below your heart frame.

Select your frame layer again in the pallets. Copy and paste your tube and place where you desire. Resize if needed but don't forget to sharpen it if you do! Drop shadow 2/2/75/15.00

Copy LIPS 1 from my supplies and paste onto the canvas. Move to the top of your heart frame and position on the knot. With your eraser tool, erase the string on the knot so it looks like it is tied in. Go to your EyeCandy 4000 Gradient Glow and on the Color Tab, click the big colored box and change the color to B03a66. Click on the Basic Tab and change the glow width to 3.00. Ok. Drop shadow 2/2/45/3.00

Copy and paste the FLOWER BLOSSOMS 1 from Doris' kit and resize by 75%. Sharpen once. Move over to the left side. Duplicate and merge down 1. Duplicate again and mirror. Merge down 1. Drag these below your heart frame. Drop shadow 2/2/45/3.00

Select the top layer on your pallet. Copy and paste the DOUBLE HEART of your choice. Resize by 25%. Sharpen. Drop shadow 2/2/45/5.00. Place on the lower right hand of the heart frame.

Copy and paste ENVELOPE 1. Resize by 25%. Sharpen. Drop shadow with the same settings. Copy and paste one of the smallest PINK DIAMONDS in my supplies. Resize to your liking and place on the ribbon of the double heart. Drop shadow with same settings.

Merge visible. Resize by 75%with ALL LAYERS CHECKED. Sharpen. Add your copywrite and watermark.

Hope you enjoyed this tut. :) Hugs, Lana

Saturday, January 10, 2009

Timeless Love ~~ My second tut creation

Timeless Love
This tut was created using the wonderful kit by Doris called "Timeless" which can be purchased at
Thank you once again Doris for the great kit!
No other supplies needed except the tube of your choice.
On to the tut.....

Make a new layer 600 x 600 with white background.
Copy and past your Frame Wrap #2 as a new layer and resize by 75%. Sharpen once.
Using your selection tool, make a square on the frame just slightly larger than the frame opening.
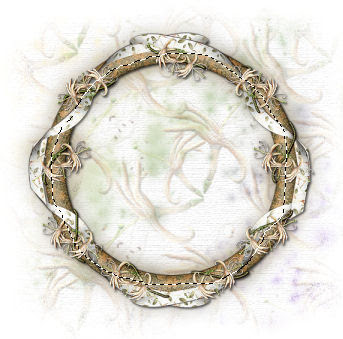
Copy and paste a paper of your choice. I used paper #10 and resized by 75%. Select, Invert and hit delete. Sharpen once. Move this paper below your frame. Select your frame layer and drop shadow 2/2/55/5.00 then -1/-1/55/5.00.

Copy and paste the tube of your choice. Risize if needed. Don't forget to sharpen it if you resize it! Move the tube so that it just goes over the bottom of the frame. Duplicate your tube and move the duplicate layer below your original tube and frame. Now erase the overlapping part of the tube on the top tube layer. Now it looks like your tube is coming out of the bottom of the frame! (I also erased part of the wing that overlapped the ribbon). Highlight your bottom tube and drop shadow 2/2/55/10.00 
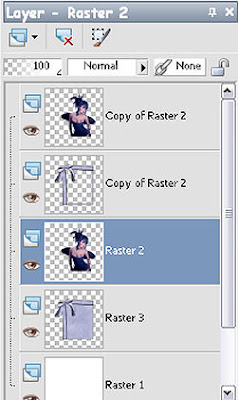
Hide your white BG layer and merge visible. Duplicate your frame layer merged group. Merge down (This just gives it more substance). Duplicate again. On your bottom frame layer, go to image, free rotate, and select Left 15%. Highlight your top frame layer now.

Open your FLOWER STRING 3. Resize by 50%. Copy and paste onto your working canvas. Move over to the center of your bow and drop shadow 2/2/55/5.00 the sharpen once. Merge down to the top frame layer. Open your template in the kit. Copy and paste as a new layer. Move it below your frame layers and ontop of the white BG. Center it behind your frames (don't worry about it being off-center, we will fix that later). Drop shadow 2/2/55/5.00 Highlight your top frame layer. Copy and paste BLING #1. Resize it by 40% and then 65%. Sharpen once. Move it to the top left corner of your template. now move it below your frame layers but ontop of the template. Sharpen once. Duplicate this layer and merge down one. Drop shadow 2/2/55/5.00. Duplicate again and Image, flip. Merge down one. Select your top frame layer once again. Open FLOWERS 2 and 3. Resize each of them by 50% TWICE. Sharpen once. Copy and paste each flower onto your working canvas. Move them both to the top right or to your liking. Drop Shadow each the same as above. Merge them together. Drag them below your first frame layer. Duplicate the flowers and merge down once. Duplicate again , then image, mirror, flip. Adjust these closer to your frame or to your liking. Hide your white BG now and merger visible. Now you may center your tag onto your white canvas. Open your BUTTERFLY #1 and resize 50% twice. Image, free rotate Left 30%. Sharpen three times. Drop shadow same as before. Move it to the bottom right of your frame and merge visible. Image, resize (all layers checked) 75%. Sharpen once. Add your copywrite and watermark. Finis'.... hope you liked this tut. Hugs, Lana

Some more new tags that I have done.....

Photobucket Photobucket Photobucket

Thursday, January 8, 2009

Alright, I finally broke and wrote my first tutorial. Lol. You guys just broke me down. So here it is and hope you like it. Enjoy.
Visions Blue Tag
This tag was created with a beautiful and FREE kit by Doris called
"Blue Feelings" and can be found here: http://www.scrapsdimensions-dorisnilsa.blogspot.com/
Thank You Doris for this wonderful kit!!!
I used the wonderful artwork by Ismael Rac and can be purchased at :
All other supplies that I used can be downloaded here: www.4shared.com/file/79636329/33996cd1/Visions_Blue_Tutorial.html