Thursday, April 16, 2009

Play Me Again Tag Tut

This tag was created with a wonderful kit by Seashell at: http://seachellscrapz.blogspot.com called Rock Me. Thanks Seashell!

I used the wonderful art of Elias Chatzoudis and can be purchased at: http://mypsptubes.com

Filters i used for this tag are EyeCandy5 Impact Glass and Graphics Plus Peacock. Also Xenofex2 Stain.

New Canvas 600 x 600 white.
CP Element 11 and resize 70% sharpen. I lasso'd the crown and deleted it.
CP Element 17 and resize 70% sharpen. Move it down below your Element 11 layer. Image-Flip. DS 2/2/45/8.00 Black.
CP Element 14. Resize 50%, sharpen. Image-free rotate-20% to the right. Move to the bottom of your belts and DS same x 2.

On your white background layer, selections- select all.
CP Paper 11 or your choice. Resize it to 600 x 600 pixels. Selections-modify-contract by 10. Hit delete. DS the same then -2/-2/45/8.00 and merge it down to the wohite background.

With your magic wand, click inside the big heart. You may have to do this a few times to cover the whole area. Layer-New Raster Layer ok.
Effects-3d effects-cutout with these settings:
Vertical=2
Horizontal=2
Opacity=100
Blur=8 and color=FFC0C0 ok. Keep it selected!

Click on your skull heart layer. EC5 Impact glass with these settings:
Color=FFC0C0 and under the BASIC TAB:
Bevel Width=35.50
Refraction=11
Inner Shadow Opacity=35
Shadow Glow=32
Under the LIGHTING TAB:
Brightness=16
Highlight=75 White color.

Ok and then select none. Merge this layer and your cutout layer down to the original heart/doodle layer. Resize the doodle layer 85% now, sharpen and move up alittle.

Hide your white/frame background and merge visible. Unhide and add a music symbol or other where the crown was if you like. Merge it down to this layer.

CP a tube of your choice. Resize and sharpen if needed. DS 2/2/75/10.00

At this point add your name and © to the tag and merge it to the tag layer.

Ok, here is where it gets a little bit tricky but I have faith that you can pull it off with stunning results! Lol.

With your magic wand, select inside some of the wing feathers. Make sure to select a good amount for a nice effect! Once you have selected all you want, Effects-Xenofex2-Stain with the color 8E2E30. All other numbers standard. Ok. Keeping selected, duplicate the tag layer 1 time so you have 2 tag layers now. KEEP SELECTED! If you are familiar with layers, you can do more than 2. Hide the top tag layer.

Effects-Graphics Plus- Peacock. All settings are standard EXCEPT move the green toggle to 0, Blue to 37. ok. Now hide your bottom tag layer and unhide the top tag layer. Apply the Peacock effect again but change the Variation up a few numbers. ok. Select none.

On to the animation....

In PSP... Edit-Copy Merged. In Animation Shop... Edit-paste as new animation. In PSP... Hide the current tag layer showing and unhide the second one. Edit-Copy Merged. In Animation Shop... Edit-Paste AFTER current layer.

Check your animation by clicking on the little movie icon in the task bar. If you like the animation, save as a gif and you are done.

Hope you had fun with this one. Hugs, Lana

Tuesday, April 14, 2009

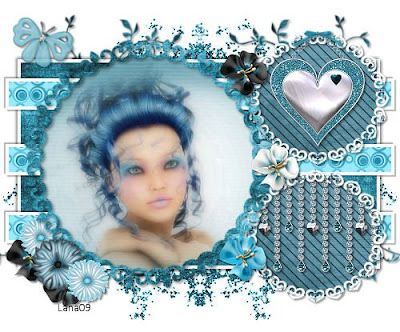
Beautiful Blue Tag Tut

Beautiful Blue

The kit I used for this tut "Shaken Not Stirred" was created by Lisa at StartFromScrap and can be purchased here: http://startfromscrap.blogspot.com/or here: http://digitaldreamsscraps.com/ Thank you Lisa for such a great kit!!!!

The template I used was from GG and can be downloaded here: http://www.4shared.com/file/98566500/81772e1d/GG_Template_147.html

Just a word of warning with this tut, you will be making everything pretty much even though we use the kit but other than the main template, I will show you how to make your own.

On to the tut.....

New Canvas 500 x 500 White.

Open your GG Template 147, hide the credits layer. Highlight the Frame Fill Layer. Float and Defloat (CTRL AF and selections-defloat). CP (Copy and paste) paper 7 from the kit onto this and Select-Invert-Delete. Select None and CP this onto your working canvas. DO NOT MOVE IT!

Back to the GG Template. You can delete the paper layer you just made on it now. Highlight the Frame Layer. Float and Defloat again. CP Paper 2, selections-invert-delete. Select none and again CP this to your working canvas.

Still on your working canvas, highlight your first circle background layer. Float and defloat. Paste a tube of your choice (resize and sharpen if needed). Invert and Delete. Select none. Select your frame layer and DS (drop shadow) 2/2/45/5.00 Black. Hide your white background and merge visible. Unhide and move your new frame layer slightly to the left.

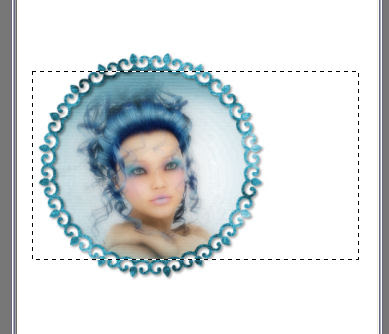
Using your Selection Rectangle tool, draw a rectangle like I have pictured above. Layers-New Raster Layer-Ok. Flood fill this rectangle on the new layer with white. CP Paper 2 again or one of your choice. Selections-modify-contract by 4. Selections-invert-delete. Select none. Now, on your white layer that is below this DS the same then -2/-2/45/5.00 black. Merge your paper rectangle down to the white rectangle. Drag it below your tube/frame layer.

This is what you should have at this point:

Layers-New Raster Layer. Draw out another rectangle again but thinner like I have shown:

Flood fill with white again. Selections-modify-contract by 4. CP paper 22 or one of choice., resize it by 80% and select-invert-delete. Select none. DS your white bar 2/2/30/2.00 and then -2/-2/30/2.00. Merge the thin bar paper to the thin white bar. Layers-duplicate and move down to the middle. Duplicate again and move to the bottom so that you have 3 cross bars. Merge the 3 bars together.

Back to your GG 147 Template. Highlight your Doodle Leave layer and float/defloat. CP paper 24 or choice. Resize by 80% and sharpen. Selections-invert-delete. Select none. CP onto your working canvas and move just above your white background. With your pick/deform tool, stretch out the top and bottom just a hair so you can see it more. DS 2/2/30/2.00 Black.

Back on your template. You can delete any layers that you previously created to make things a little easier. Highlight the Right Fill Layer, float and defloat it. CP paper 9, resize 50% X 2 and mover it to the circle. Selections-invert-delete. CP onto your working canvas as a new layer but DON'T MOVE IT!

Back on your template. Highlight the Right Frame Layer. Float and Defloat. CP paper 12 or choice. Resize it by 35% and sharpen. Move it over to the frame. Invert-delete. Select none and CP onto your working canvas. Move both the little circle and frame layers to the top right of your rectangle. Duplicate both layers and move them down so that now you have 2 smaller framed circles. DS each small frame layer 2/2/45/3.00

CP Element 4 from the kit and Image-resize-20%, sharpen. Move it to the top small circle but under it's frame layer. DS 2/2/45/3.00 black. CP Element 3. Image-resize-40%, sharpen. Move to the lower circle under the frame. Now, select this bottom circle background in the palets and Float/defloat the little circle. Highlight your heart layer Element 3 in the palets. Selections-invert-delete. DS your hearts chain the same.

CP Element 5 Butterfly. Image-resize-15%. Sharpen and mover to liking. I rotated mine 20% to the right by Image-free rotate-20% right. DS same.

Hide everything but the 2 small circle, their frames and hearts. Merge visible. Unhide all. Move your two small circles below your large circle layer in the palets.

CP flowers of your choice. Resize to your liking & sharpen. Position where you want them, DS each of them 2/2/45/5.00. Hide your white background and merge visible. Resize your tag layer if you wish at this time and sharpen. If not, leave it be.

CP Glitter 4 from the kit. Resize 75%, sharpen X 2 and move a little to the left and under your tag layer. Layers-duplicate. Image-Mirror. Merge these two glitter layers together.

With your selection rectangle tool again, Draw around your whole tag so that you are cutting off the excess at the top and bottom. Image-crop to selection.

Add your name and © to the tag layer. Merge visible and save as a jpg.

Hope you liked this tut and making your tag without using any templates other that the one.

Wednesday, April 8, 2009

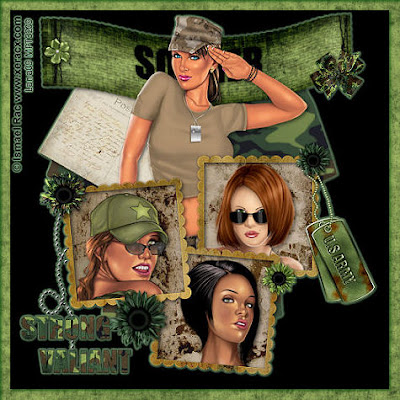
In The Army Now (PTU)

This tut was made with the irresistible kit of Seashell's called "In The Army Now" and can be purchased here: http://seachellscrapz.blogspot.com

Create a new canvas 500 x 500 Black Background. Open Element 61 frames. Image-Rotate Right. CP onto your canvas and resize 50%. Move to the lower part of your canvas. With your magic wand, select inside each frame. Selections-Modify-expand by 4.

CP paper 10 onto canvas and resize by 50%. Move over to frame. Invert-Delete. Sharpen and move below the frame. Hide this layer in the palets now.

Magic wand one of the frame openings, Selections-modify-expand by 4. CP a Tube of choice. Select-invert- delete. Select none and mover below frame layer. Repeat steps for the other 2 frames. DS each tube 2/2/60/7.00 and well as the frame itself. Hide your black background and merge visible.

CP one of the t-shirts. Move behind your frame layer and resize 75%. Sharpen. CP your main tube and move behind the frame. Resize and sharpen if needed. CP Element 64 Post Card. Resize 50% then 75%. Image-Free Rotate- Right 30% and move it up to top left corner and behind your main tube. Sharpen and DS same. CP Flowers of your choice. Resize 40% twice and sharpen. Move to your liking.

CP Element 31 or your choice of banner. Resize 75% and sharpen. Move it to the top and below your main tube. CP Element 24 Bow. Resize 20%, sharpen and put on bottom right corner of the banner. DS same. CP Element 68 Chain. Resize 20% then 50% or to your liking. Image-Flip. Image-Rotate Left 40%. Hang it under one of your frame flowers. DS same. CP another flower of your choice and resize to liking. Put it on the opposite side of the banner, sharpen and DS same. CP words of choice. Resize to your liking, sharpen, and hang off the chain. CP a dog tag of choice. Resize to liking, sharpen and hang off of the banner bow.

Hide your black background and merge visible. Unhide and select your tag layer. Effects-EyeCandy 4000 Gradient Glow with these settings: Glow Width = 3.00 Soft Corner = 25 Opacity = 100 Draw outside only = checked Under the color tab = color is #93c791 all others settings standard. Ok.

Merge visible. Image-Resize all layers checked 450 x 450 pixels.

Image-Canvas Size-475 x 475 with Center Square checked. Top = 12 Bottom = 13 Left = 12 Right = 13.

With your magic Wand, click on the new border around your tag. CP paper 3 as a new layer. Selections-Invert-Delete. KEEP SELECTED!!!!

Invert again. Layers-New Raster Layer-ok. Effects-3d effects-cut out with these settings: Verticle=2 Horizontal=2 Opacity=65 Blur=4 and the shadow color and darker green you want. Click on the color box to change it. Fill with color NOT CHECKED. DS the same on this cut out layer and merge visible.

Add your name and © and save as a jpg.

Hugs, Lana

Saturday, April 4, 2009

Forever Hopeful Tag Tut (PTU)

Forever Hopeful

This tut was made with the fantastic creation of Helga at ClassieCreationz and called Joy Of Hope kit. It can be found here: www.helgasclassiecreationz.blogspot.com

I am using the art of Ismael Rac and can be purchased at MPT. Please do not use without a valid license.

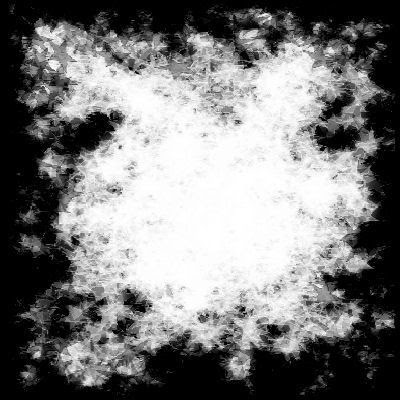
Here is the mask I am using. Just right click and save to your computer somewhere...lol.

Create a new canvas 500 x 500 white.

CP frame 1 and resize 50% then sharpen. With your selection rectangle tool, draw around the outside of the frame opening. CP another paper of choice, resize by 50% and sharpen. Place it in the center of your outlined square, invert and delete. KEEP SELECTED!

CP a tube of choice. Resize, sharpen and center in the box. Hit delete. DS 2/2/45/5.00 and then on your layers pallet double click on this layer. Change the opacity to 75%. Deselect.

CP the main tube of your choice. Resize if needed and sharpen. Place it to your liking. DS 2/2/75/8.00

CP Bling Flower 1. Resize 50%. Image>Free Rotate>Right>60%. Sharpen and then move to the left of the frame. Layers>Duplicate. Layers>Mirror and position if needed. Merge these 2 blings together and move them below the frame and paper layer. Duplicate again and merge together. DS 2/2/45/5.00

Open Flower 1 & 2. Resize to your liking and sharpen. Open Sunflowers 1 & and 2. repeat. CP all of them onto the canvas and position to your liking. Drag them below your main tube layer. DS the same. Open Doodle 1, resize 40% and sharpen. CP it onto your canvas. Image>Free Rotate>Left 40%. Sharpen again. Move it under your flowers you just did. DS the same. I duplicated this and mirrored it then moved it under the lower flowers. Merge all your flowers and doodle together.

Open a Sunflower. CP a Wax Seal of your choice onto the middle of the Sunflower. Merge them together and then CP onto your canvas. move to the top right of the frame. Resize if needed and sharpen. DS the same TWICE.

Open a bead string of choice. Image>Rotate Right. CP as a new layer onto your working canvas. Resize 15% and sharpen. Move to the top corner under your Sunflower. DS same TWICE.

CP Butterfly 1. Image>Resize 15%, sharpen. Move to the end of the bead string and DS same twice. CP a bow of your choice. Resize 15%, sharpen, move to the middle of the bead strand and DS same TWICE. Add any other elements you wish to at this time.

Select your frame layer and DS 2/2/60/10.00 Hide your white background, blings, paper layer and inside tube. Merge Visible. Unhide. Now Merge your Paper, blings, & inner tube together. You should only have 3 layers now; white background, paper and inner tube layer, top frame tag layer.

Select your white background layer and CP another paper of choice from the kit. Open your mask. Layers>New mask Layer>From Image and select the mask. Apply it. Merge group and then merge down to the white bkgrd. If you are not animating you can merge all layers, add your name and © then save as a jpg. If you are animating, add your name and © now then merge to the top tag layer.

ANIMATION

Open Animation Shop. Hide your white bkgrd/mask layer and the top tag layer. Copy MERGED the middle layer with the paper and inner tube on it. Paste as a new layer in AS as a new animation. In your tool bar: Effects>insert image effect. On your image effects screen the "Start with" box should have Animation Frame Checked. Direction NOT checked. Effect = Underwater. Click on the "Customize" button and select Apply Sunlight Dappling. Sunlight intensity = 10, Water Depth = 10. Hit your "remove wave" button once. Ok.

Now you should be back on the main image effect screen. Move the slider bars down below to read... Effects length = 0.9 sec and Frames per sec = 6 FPS Ok. You should see a total of 6 frames. Go to the very first frame and click on it then hit delete. Now you have animated frames.

Back in PSP.... Hide your middle layer and unhide the top tag layer. Copy Merged. Back in AS, paste as a NEW ANIMATION. Hit the duplicate toggle button in the tool bar 3 times so that you now have 5 frames of your tag layer. CRTL A C.

Click on your middle layer frames that you just got through making. CTRL A E. and center the tag onto the animation. Click your mouse.

Back in PSP.... Hide your top tag layer and unhide your bottom white/mask layer. Copy MERGED. In AS, paste as a NEW ANIMATION. Duplicate this again with the toggle button 3 times to make 5 layers.

Now, click on your tag animation you just made and CTRL A C. Click on your white mask animation layers and CTRL A E. Center the tag onto the background and click your mouse.

Check your animation with the little movie icon in the task bar. Save as a GIF.

Hugs, Lana